
Music reviews
&
helpful information about recording and mixing techniques. Posts written by professional engineers and musicians.
Learn about the inside secrets that engineers at Shine On Studio use in their sessions. Become a mixmaster and impress the world with your knowledge of audio production.
Trade Gear for Studio Time | Get More From Your Gear
Trade your musical equipment and instruments for studio time. Great way to unload the gear that you don't use or don't need any longer and get some quality studio time to work on your next recording or mixing project. You can also trade gear for Pro Tools lessons. Click the post title for more details.
You have gear just collecting dust and that's not the plan you had in mind when you bought it. You don't want to sell it on eBay cause you won't be able to get hardly anything for it. Now you're stuck with gear that is just taking up space.
Here's a solution that will benefit you and also help Shine On Studio & the studio's students that are trying to make the start in the music industry. I'm always looking to try new gear and add gear to the studio. Options for gear allows musicians to get the sound that's in their heads. Plus, studio interns donate lots of time to helping with sessions and doing work in the off hours. This will be a great way for me to repay them for all their hard work.
Contact the studio for further details.
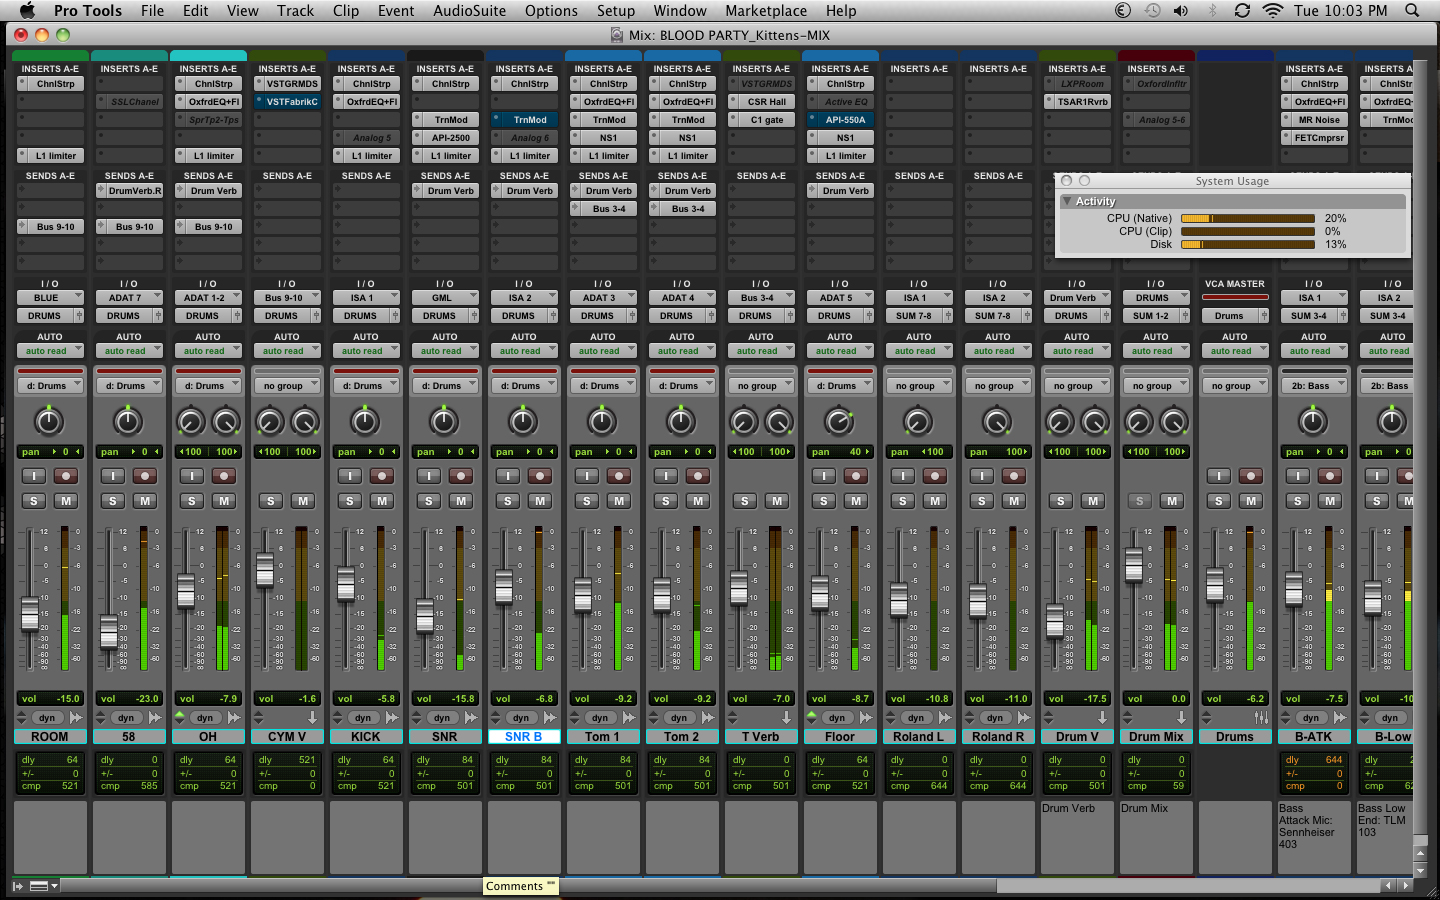
Mixing Snare Drums
Snare is the pulse of a rhythm section. It pumps movement into a song and supports the kick drum. However, the snare drum can be one of the more difficult sounds to mix. Snare is usually so prominent that it resides up front in the mix and usually sits right behind the vocals. So here are a few tips for good mixing techniques to get the snare in the pocket.
First, use good mic placement to capture the tone and ring of the snare that is desirable for the track. Typically a SM57 is used for snare tracking, but you may want to experiment with other mics to see if they give you a sound that is more desirable. I've used a Sennheiser e606 with great results for rock and punk snare recordings. Paired with the right preamp, you can really sculpt a tone that is your signature.
The next step is EQ. See if you can find the frequency that is prominent in the vocal track and then notch out just a touch of that frequency in the snare track. Also, use filters to help shape the tone of the snare so that it fits nicely into the mix with the other drum mics. As a sidenote, be sure to monitor your overhead mics as they will have plenty of snare sound. Sometimes there is a boxy sound to the snare around 300 Hz. Sweep your EQ around this frequency range and find the Boxee sound. Once you found the undesirable tone in the snare just notch it out a dB or two. This will help your snare cut through the mix and sit nicely behind the vocal track.
Behind the Scenes | Recording Engineer Clean Up Work
The recording engineer's work is not done after the session is over. The engineer must spend time working on the audio files to clean up unwanted noise in the files and make sure that fades are properly applied to smooth transitions. Back up copies need to be made and even though the engineer doesn't sit there and watch the computer transfer files, the engineer has to wait and check after the transfer is done to make sure that all the files transferred properly.
I'm usually in the studio hours before a session to check on timing issues and pitch correction. Returning to a session after taking some time off allows me to hear the tracks again with fresh ears. This way I'm more likely to catch little mistakes and focus on the recording's blemishes. This also gives me time to focus on ways to approach and produce the recording. I usually take this time to make notes for mixing the tracks. This way I am prepared for mixing as soon as the client arrives at the studio. If any re-tracking is required, will usually start there and then proceed to mixing. It's the little things like this prep work that keep my clients happy and keep them coming back to record more at Shine On Studio.
Recording Studio Tips | Record the Right Way
Studio time is very precious. Do a little prep work before you head into the studio. Get your tracks ready and plan out what you'll be working on during your studio session. Most importantly, go in to the studio excited to work on your music. Your attitude will reflect in the music. Bring comfort food and wear comfortable clothes that you can relax in while you are in the studio. Pack up for the studio the night before your session. This will ease your mind and help keep your blood pressure down with little stress as you embark on a momentous occasion.
Recording Studio Tips | Turn your phone off
When you're in the studio, turn off your cell phone. There is nothing to be gained by allowing the outside world to interrupt your genius. Focus on the music and let the moment unfold with your undivided attention.
If you use your phone for lyrics or notes, that's obviously something you need handy. Just move it into airplane mode and resist the temptation to play any games. If you take photos with your phone, save the social media sharing for after the session. Unfocused time in the studio is wasted time in the studio.
Recording Studio Tips | Bring a Back-Up Hard Drive
A good rule of thumb is to always bring an external hard drive or flash drive as a back-up for all your studio recordings. You've invested your heart, soul, time, and money into the recording, so be sure to make an extra copy (or two) of your session files. Things happen and you don't want to loose all your hard work only to wind up starting over from the beginning. Now that storage media is so affordable, there is really no reason you shouldn't back up all your work. There are lots of great websites to get a good price on storage media. Check http://www.macmall.com or http://www.amazon.com for great deals. If you need any advice on purchasing storage media, just contact the studio.
Preparing Tracks for Mastering
The recording and mixing is finally completed and you're really happy with the final mixes. Now, you're ready to get your tracks mastered. There are a few things you need to make sure are in place before you send your tracks over to the mastering house.
First, make sure your peaks don't exceed -6dBFS. There needs to be some headroom for the mastering engineer to work. When you send your mix with no headroom, the mastering engineer is limited by what they can do. When I've worked on tracks that have no headroom, I have to spend time with the gain structure to allow for any adjustments that will enhance the mix.
Second, send uncompressed .wav files for mastering. It is never a good idea to send in .mp3 files for mastering. The lossy codec of the mp3 has stripped away rich audio details that the mastering engineer will need to deliver a quality master. It's best to send files from their original sample rate and bit depth. If you tracked at 96KHz, then send the mastering engineer 96K .wav files to master. The mastering engineer will do the final dithering and make sure that all files are formatted for public distribution. If you're unsure of what to send a mastering engineer, just ask them. A mastering engineer will be more than willing to provide you with details about what to deliver. This will save a lot of time if there are any problems with the files you send over.
No Platinum Albums in 2014
DeathandTaxesMag.com has an article out talking about the fact that no albums went Platinum in 2014. Now could this be because there wasn't any outstanding music in 2014? I highly doubt it. With albums from the Black Keys, Beck, & Jack White hitting the store shelves this year, the odds are in favor of music being available to go platinum. The new Taylor Swift album just hit shelves and is trying to make a big push for the holiday season, but it might be too late to save a bleak year in music sales.
Just in general, CD sales have steadily declined since the era of MP3 players. Buying a CD is not translating to the younger generations. They have no interest in collecting CDs when they can just easily download and share music digitally. Companies like Rhapsody are single handedly killing the music industry CD sales. For only $10 per month, listeners can have access to almost all the music in the world. Then they can rip the music and share it with their friends that don't have a Rhapsody account. Digital media has changed how people listen to music and the listeners will no longer pay high prices for CDs ever again...if they ever do buy CDs again.
When I go to local shows, I buy a CD from the bands for a few reasons. First, I want to support local musicians and independent music. This is where the focus of the music industry should be. If we don't support the local music scene, then we won't have any new music. Second, I like collecting unique and rare band albums. Some of these bands will only be around for a short while before the music industry gobbles them up and forces them to find another way to earn a living. So I like that my CD collection is comprised o music the most of my friends have never heard. In addition to all the great music that is recorded a the studio, I have a collection of songs that no one else on this earth has heard.
Now I'm not encouraging readers to go out and buy CDs to help stimulate the market or help main stream musicians reach platinum status. I am encouraging readers to buy CDs from indie bands and help stimulate the local music scene. Be supportive of local musicians that write and perform original music. This is the essence of music that connects us spiritually to one another and to the universe. So get off your couch once in a while and go out to see a live show. Cheer on a band you've never heard before. Support music so it can go on inspiring us and future generations.
A client has posted the 'No Platinum Albums' article link on his FB page: https://www.facebook.com/binsacca/posts/10152794615819190
Keep your vocals in good condition
Singing professionally is a tough business. Vocalists constantly condition and exercise their throats to stay in good form. When you make a living using your voice, it's can be a constant discipline to keep it in shape. Regular breathing exercises and proper fluids tend to be excellent choices for the marathon singers that perform almost every night.
Before a long day of tracking vocals in the studio, it's a good idea to have done some prep work. Don't drink any cold fluids before you start your recording session. It's also a good idea to drink warm tea or something that will soothe your throat. Take a decongestant if your sinuses are acting up and don't do anything that would cause you to sneeze constantly. Things like dusting the house before a recording session can be disastrous to your vocals.
If you're singing in a band or getting regular work to sing professionally, take time each day to warm up your voice. Keep exercising your lungs, throat, and jaw muscles. Just as runners need to stay in shape for the marathon, vocalists need to stay in shape for the performance.
Today's FAQ : What's a DI?
DI is short for 'direct input' and it means you take a direct signal from a source. Usually a DI will be used for recording guitar, bass, and keyboards.
"Why should I use a DI, when I have a perfectly good amp that can be mic'd?"
Good question. If you like to mic up your amp, go ahead and do it. As a secondary back up, I'd suggest splitting the signal and tracking a DI along with your amp. You'll get a nice clean track along with your amp track to work with when you mix. Think of it as a safety net in case the amp track doesn't work out. Maybe the mic didn't capture the tone you wanted, but the performance was epic. If you tracked a DI, then the performance has a chance to be relived & re-amped!
Re-amp your performance with the DI track. You can now play back the clean DI track and feed the signal into your amp. Move the mic around until you find the tone you desire. Now you have lots of options with minimal effort and you look like a seasoned pro. There are other options like using the DI track with amp emulated software. This way you can shape your tone with digital ease. There are so many possibilities with digital software that you can try out many different sounds to hear what works best for your mix. There are so many options at the fingertips of engineers, this is a great time in musical history. Take advantage of the DI and begin to explore what your music can become.
I use a Countryman 85S for most of my DI tracking. It does provide clean and clear tracks without coloration. I'd recommend it to anyone looking for a solid DI. It is my go-to DI for nearly every direct recoding done at the studio.
Most preamps can be used as a DI. I have a GML 2032 that I regularly use as a DI for bass guitar. The built-in EQ works wonders on shaping the bass sound so that it fits beautifully within the mix. Typically all I have to do is add a little compression and the bass finds a pocket in the mix.
I also have a BBE DI-1000 w/ a Jensen transformer that works amazingly well on acoustic guitars. The BBE Sonic Maximizer allows me to add just the right amount of brightness to the DI track. That way I don't have to spend hardly any time EQing the track.
I'd love to hear more from everyone. Please share what DI boxes you use for tracking.
Mastering | Do it yourself Mastering | DIY MASTERING
Learn how to set up your studio for mastering. Engineer David Hughes talks about certain things that are important when mastering music. There is a video link in this posting where David shows you how to set up your Pro Tools session for mastering.
The time has come for mastering, but you've gone over your budget on the project. There is only one solution, you're gonna have to try your hand at mastering. This can be a scary idea, but not one that is impossible. Let me give you a few helpful tips to calm your nerves. This can be a simple and straight forward experience that will give you a deeper appreciation for your own music.

First thing is to determine where you are going to try and accomplish this feat. If you don't have a acoustically treated room, then use a room that you usually use to listen to music. A room that you're familiar with and can gauge the level of sounds with ease.
Second, give your mixes a little bit of headroom. Typically I request -3dB to -6dB of headroom on the final mix. This will allow you to EQ and compress to the level you want without generating too much distortion or digital clipping.
Third, start with subtractive EQ. Pull out the frequencies that are clouding or mudding up your mix. Get a nice clean tone to the mix before you start to compress or limit. Once you have a nice clean mix, try a compressor on the signal. Any compressor will do, but if you have one specifically for mastering, even better. Bring the threshold down until you see 2-3dB of gain reduction. Adjust your attack and release times so the compressor doesn't make the music pump. A slower attack time can allow transients to pass thru and retain a crisp dynamic range in the mix.
Forth, this is the most important part. Use a limiter that has a built in dither. Quantize to your desired bit depth. Most audio is dithered to 16 bits and this bit depth is optimal for CD quality. Be sure to use the appropriate noise shaping. Type 1 is best suited for voice over or narration. Type 2 is best for mixes that have multiple instruments. The final level is up to you, but this is why I suggest a room you're familiar with. Play a track that you want to use as reference. This will help you gauge the final volume level you need to achieve. A/B your master with the reference track and make your adjustments. It's really important to set your monitor levels at a modest volume. Don't fatigue your ears with loud volume levels. Keep an eye on the gain reduction in the limiter. My rule of thumb is less than 4dB of gain reduction is acceptable. Higher levels of gain reduction lead to hyper-compression and loss of dynamic range.
There will be some level of trial and error that you may have to overcome. Don't worry, you're new at this and the learning curve can be steep. You're not a pro mastering engineer, but you do have the ability to get a decent master with a little bit of practice. Give it a shot and if it doesn't work out, you can always save up to send your mix out to a pro mastering house. Just have fun and see what you can accomplish on your own.
What was that? Delay Delay Delay
To delay or not to delay, why is this a question? Delay is what makes the music come alive! Delay can be very tasteful and should be used to some degree on every mix. It can be subtle and very light, but it will give your mix that edge that kicks it up a notch.
Lexicon PSP 42
Delay comes in many forms and with even more parameters. Some delays have built in filters, while others have feedback control. No matter what delay you choose to use, experiment with the controls and get a feel for how the delay responds to the audio. Once you know how the delay impacts the audio, use it to blend the sound into the mix. You can also get creative with your delay tone by adding a distortion or a flanger effect. Make the delays stand apart from the original track and they will have more impact on the mix.
Analog Delay
If the delay has a sync feature, that can be useful if your music has a tempo map and sticks to the BPM grid. Quarter notes usually have the right amount of space and make a big impact on the empty pockets of the mix. If your mix is not on a tempo map or you're looking for a more organic sound, then turn off the sync feature and set the delay by hand. This technique is a great way to get a vintage sound for your mix. Some of the greatest mixes of the 70's have delays that were set by hand. Don't be afraid to try something new and set your own echo or delay.
Selecting mics for recording live drums | Overhead Mics
Selecting the right Mics for a live drum recording can be a difficult decision. Drums tend to have an unique sound for each individual kit. You also have to take into consideration the style of drumming. The drummer is just as much a part of the kit, so based on how the drummers plays the kit should factor in to your decision.
Overhead mics are by far the most important decision you make when deciding to record drums. About 75% of your audio will come from the overhead mics. Overhead Mic placement is also a big factor whether you do a symmetrical or asymmetrical mic placement.
Condenser mics are usually the first choice for overhead mics on a drum set, however many engineers have had lots of success using dynamic microphones for their overhead mics (OH). The goal is to capture the essence of the drum kit. Putting the drums in the mix to set the mood for the music is the goal. How you sculpt your sound will define your ability to record and mix a quality production.
I like to treat drums as a single instrument and not a bunch of individual instruments. This way I can place mics where they are most beneficial to the recording. Sometimes I'll mic each of the rack toms + overheads + a Beta 52 on the kick. This will give me a more snappy and punchy sound to the kit that is great for a song that needs strong dynamics and percussion. Other times I'll just use a SM57 on the snare + Overheads + an AKG D112 on the kick for tracks that are jazz flavored. These are just a few examples, but versatile dynamics for the type of drums that will fit in the mix.
You can always place mics and then decide if they are relevant to the mix. Just watch out for phasing and over-ambience. The more mics in the mix, the more likely you'll have phase problems or what I like to call a foggy mix. Try starting your mix with just the overhead mics and mute all other mics. Listen to what the OH mics are providing and then slowly bring in the other mics. You should filter and EQ each mic so it fits in with the OH mix. If the signal is weak or disappears, then invert the phase to see if the track is out of phase with the OH track.
There's more to cover, so I'll open this topic up for Q's and discussion. Leave a comment below to add any insight you'd like to share.
Recording Guitars and Guitar Amps
Recording guitars can be a bit tricky, so here are some helpful tips. First, you should always track a dry signal of the guitar. Run a DI box before the amp to make sure you get a straight tone in addition to any mic recording you capture. This will give you the option of re-amping the track. Who knows, this could be the track you wind up using.
Try tracking with different mics. Use dynamic and condenser mics on the amp in different locations until you find the tone you're looking for. Angle the mics directly at the cone and then angled off to one side. You'll get very different tones and this can help you shape the texture of each track.
Be sure to check your phase alignment if you use multiple mics for the same take. Using two mics on a single amp can help you blend a tone that is unique and works best for your mix. Just be sure that you don't choke the tone by having tracks that are out of phase with each other. If the mics sound great on their own, but sound thin when combined, this usually means there is some phase cancellation between the two tracks.
These at just some starting points to keep in mind. Leave a comment if you have questions or would like more details about my techniques. Thanks for reading my blog.
Drum mics | Kick Drum Recording

The biggest drum seems like the easiest drum to mic, but this big fella can be tricky at times. You really have to pay attention to the music. The tone of the kick drum needs to match the tone of the music. This requires selecting and placing the right mic in the right spot to capture the tone that you need.
There are a few options I recommend. The Shure Beta 52 is a rock solid mic for any recording. It provides depth, punch, clarity, and snap that works well with virtually every recording. You can never go wrong when using this microphone to record your kick drum.
My backup mic is the AKG D112. This egg-shaped mic is versatile for many recording applications, so it's an excellent choice for those of you on a tight budget. Besides kick drum tracks, this mic works well for recording any instrument that has a lot of low-end detail. I've used this microphone to record congas, bass guitar, trumpets, horns, and vocals. So for the $199 price tag this mic carries, it's well worth the investment.
The third microphone that I recommend is a little unorthodox. The RODE NTK is a secret weapon that I like to use when I need a bit more slap in the kick drum. It's a tube-based condenser that has a magical sound when placed in just the right spot. Usually I find that spot slightly off-center in front of the drum head. The $499 price on this mic does put it in the slightly expensive category, but this mic can do it all. From vocals to acoustic guitar, this mic is excellent on almost any recording.
Hope this helps you get better kick drum recordings. Happy tracking.
How to prepare for a recording session
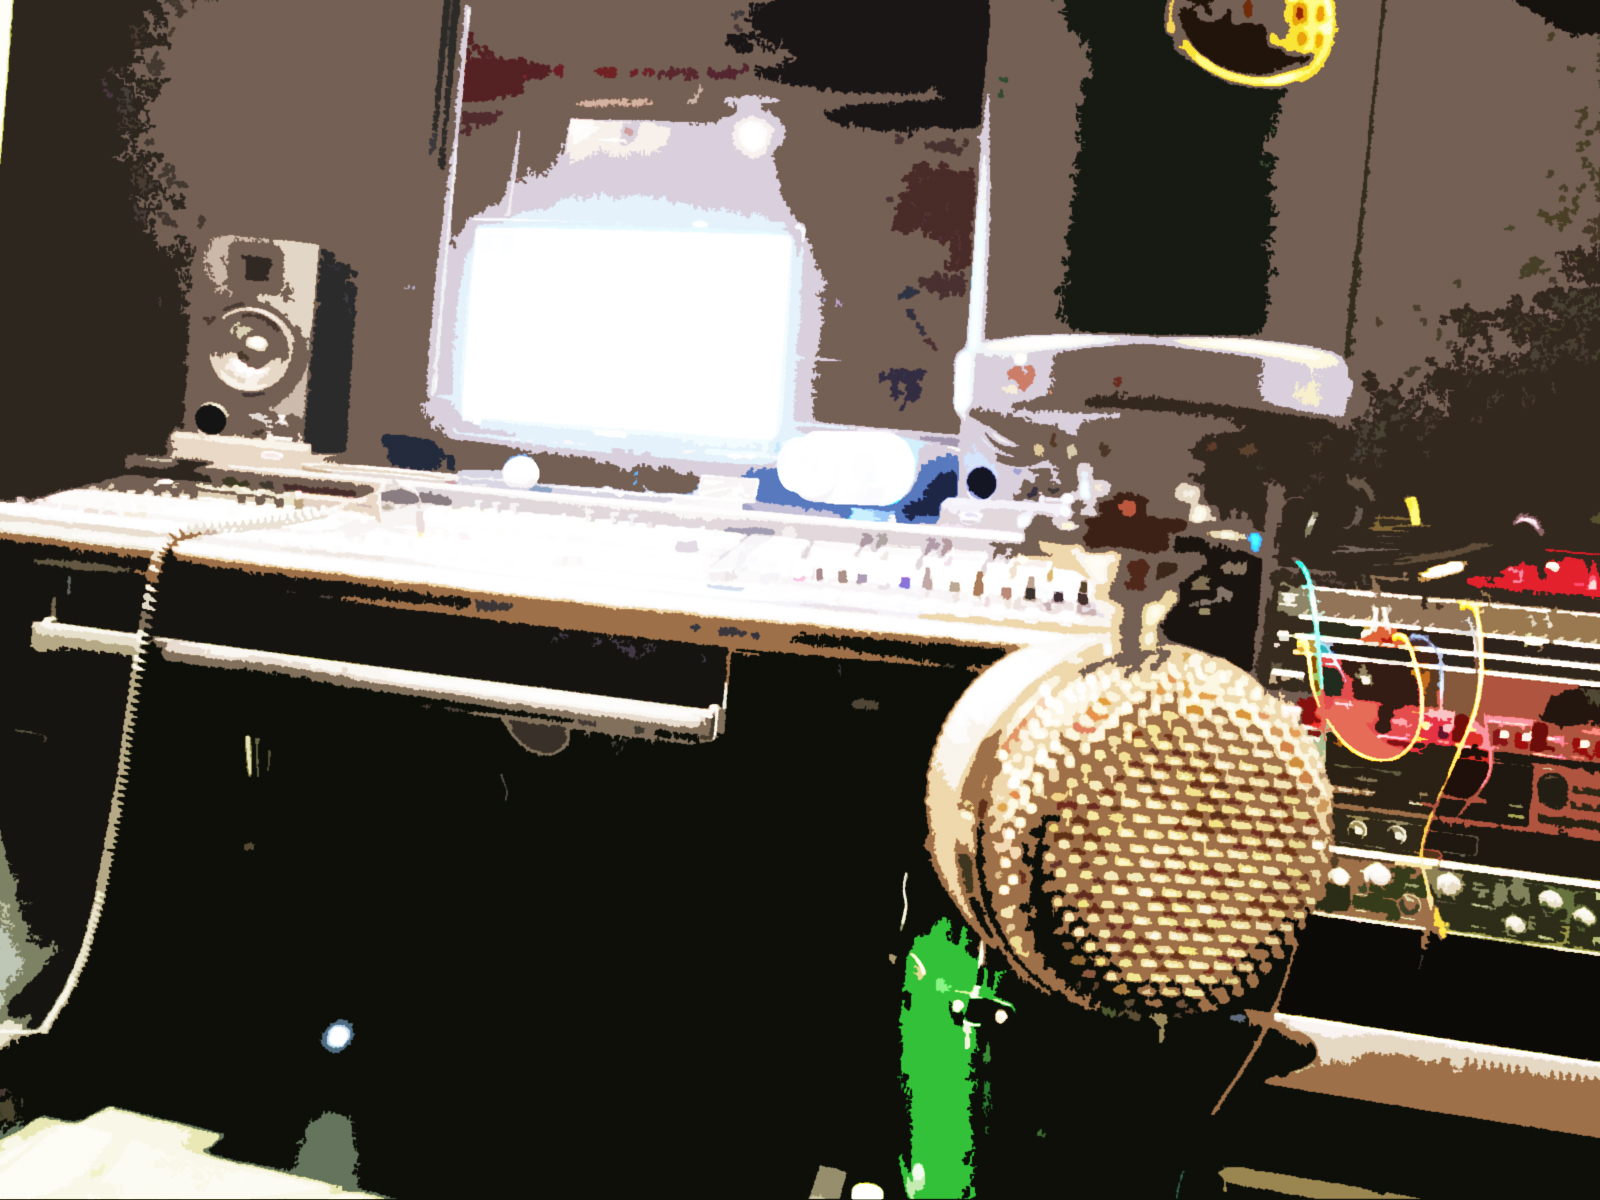
Shine On Studio • Malone Designs Euphonix Desk
The music is finally ready to be recorded. You've put hours into rehearsal and composing the music. The band has worked out all the rough spots and the music has a good flow from beginning to end. Now comes the crowning achievement, booking time at a recording studio to immortalize the music.
There are some important steps that need to be taken before you get to the studio. As an engineer that has worked at a recording studio for 2 decades, I've seen what works and what doesn't work, so I'd like to share a bit of helpful knowledge on the topic. These steps can apply to any musician getting ready to reserve time at a recording studio. I'm also going to share some tips on how to maximize and get the most productivity out of your studio experience.
First, be sure that you're ready for recording. This is a broad generalization, so let me go over the many parts that accompany this statement. To kick it off, make sure that your music is finalized and all the parts are in place. This means that the band has been rehearsing and all the band members are on the same page when it comes to performing the songs. The last thing you want to do is spend valuable studio time rehearsing parts of a song and trying to compose the music on the fly. Now it's OK to experiment and try different ideas, but there should be a core foundation to each track so the music is recorded within the time allocated to you while in the studio.
Second, be sure that all your instruments are in good shape and sound their best. In many cases, strings should be replaced at least 3 days prior to the recording session. This will give them time to stretch and settle in for a brilliant sound that will sound great when recorded. So many times I've had guitarist come into the studio with old worn out strings and they never sound as good when compared to recordings with fresh strings.
Drummers should bring a few extra drum heads and or snares just to hear what the recorded sound turns out to be. There are many things an engineer can do for your music, but try to rely on getting good raw recordings to start with and not relying on EQ to fix any deficiencies.
Vocalist should exercise their voice leading up to the session. Don't strain or wear out your voice, but condition it just like any athlete would prepare for a big game. Don't drink any cold liquids before the session because they tend to constrict the vocal chords. Bring room-temperature bottles of water to keep the throat from getting dry and if you prefer something to soothe the throat, bring honey or tea. Studio sessions usually last all-day, so it's important to stay hydrated and bring snacks to keep your energy up. Bananas are always a good idea for natural energy and trail mix is a good way to subside hunger pains.
Third, be prepared to back up your recordings. Most studios today are recording on a digital audio workstation like Pro Tools or Logic. You need to be ready to make back up copies of your recordings so that you ensure that your investment doesn't get lost, stolen, or accidentally get deleted. Most studios will have a way for you to back up your recordings on to a USB flash drive or an external hard drive. With prices rapidly dropping on storage devices, this shouldn't be a problem to find a device with enough space to back up your recordings. I'd recommend a minimum of 2 TB, but 500 GB is usually enough for most musicians. By backing up your recordings, you will have the ability to take your recordings home and mix them yourself if your budget runs out for studio time. You could also record at one studio and then take the files over to another studio for mixing. Sometimes it's a good idea to get a few different engineers working on your music to keep the sound unique and diverse on the album.
Fourth, put someone in charge of time management. Staying on track is the most difficult thing to do in the studio. You can ask the engineer to help manage the studio time, but it's always best to have a band member keep track of the time. Most everyone has a smart phone these days and they all come with alarms and timers, so use them. Set the alarm on vibrate and let it remind you when it's time to move on. Figure out how much time you want to spend recording each song or parts of a song and stick to it. So many times I've had musicians show up to the studio with the intent of recording 3 or 4 songs and only wind up recording 1 or 2 songs. It is very easy to get wrapped up in recording and over-dubbing tracks that time will just slip away. Figure out a way to manage your time and do your best to stay on schedule.
I want to give you a few helpful ideas about how to manage your recording sessions. If you have a hard time getting all your band members together, then it's best to have everyone pick a date that is convenient for a recording session and mark it on the calendar. Most studios have a no refund or no rescheduling policy, so it's important to make sure the studio date works for all the band members.
Try to get all the recording done with all the band members present. This isn't a huge deal, but I've found that it's always nice to have all the band members at the studio when the initial tracks are recorded. Things like solos or backing vocals that will be over-dubbed can be done with individual band members. If possible, try to record the band in a live environment. I don't me a live concert, I'm referring to the whole band recording at the same time. There is a lot of "magic" that happens when musicians play together. This also helps cut down on the amount of time spent tracking each individual member of the band. Plus, if you haven't been rehearsing with headphones, don't try to do it for the first time at the studio. Try and recreate the feel you get when the band rehearses. This is the way you perform the music, so try to recreate that sound / vibe when you record.
I'll have some more helpful info for you soon, but feel free to leave comments or questions and I'll respond as soon as I can. Hope this info was helpful and your recording sessions go smoothly.

Do you own the trademark on your band name or logo?
Many bands just pick a band name and then start making music. Bands spend hours designing posters, CD covers, T-shirts, and lots of other merchandise with the band name on it. After all that, it would be a huge bummer to have all that merch destroyed because another band has already trademarked the band name and owns all the rights to the name/logo. So before you invest heavily in the band, it's a good idea to trademark the band name.
If you're going to put days, weeks, months, and even years into your band's music, image, and reputation; be sure to take the time to ensure that you will own all the rights to the band name. Having peace of mind that the finer details of the legal side are all take care of will help you further your career. Plus, this will also ensure that no other band can claim the name and start mooching off of your success.
Arranging an album from beginning to end
How many times have you started singing the next song on the album after hearing a song?

There is an art to how songs fit together and a good album has a flow from beginning to end. Albums that are composed with a flow from beginning to end are a work of art. I can honestly say those are the albums that I remember and listen to regularly. There is a glue that needs to be present when you're putting songs together for an album. Making a masterpiece is something that takes time and patience to achieve.
I had an interesting conversation with a client about how to arrange songs on his album. The first song on an album is so important. The first song sets the mood for the album.
What is the most important part of an album? Is it a collection of songs or singles? Does a good album have a flow from song to song or from beginning to end?
Vocal mixing tips and secrets: Mic Placement
Everyone is looking for advice about how to get those sweet full-sounding vocals into their mix. There are many options out there and I can only offer my thoughts and experience, but I encourage all engineers to think outside of the blog, book, or videos. Come up with your own way of recording vocals and you'll be much happier with the final mix. It's a great idea to take information and techniques from multiple sources and experiment to find out what works best for the music and the equipment that you have access to at the moment.
Microphones are a major factor when you're recording vocals. Not all microphones are created equal and they certainly all won't give you the same sound. The price of a microphone isn't a concern that you should worry about when searching for the right mic for your vocal tracks. Focus on a mic that will give you what you're looking to track as a solid base for your vocals. If you're looking for clean and crisp vocals, try to find a mic that has a flat frequency response or one that at least has a smooth response in the range of the vocalist. Some mics are specifically tailored for vocals and they typically do a great job. If you have the ability to audition mics before you purchase them, I'd highly recommend that route.
Now for the first tip / secret that I use to get great sounding vocals. Placement of the mic is by far the most important place to start. Move the vocalist around the mic to find the right spot for the amount of presence and clarity. Don't just have the vocalist stand right in front of the mic. Many times, vocalists will stand too close to a mic. This causes too much presence in the low frequencies and tends to pick up a lot of sibilance. A pop filter placed right in front of the mic won't alleviate this problem. But it is a good idea to use a pop filter to guide the vocalist to the proper distance from the capsule of the mic. There's not a specific amount of space that you can use on each vocalist, you have to work with how loud and what type of tone the vocalist has for each individual track. That's why they have a goose neck for being placed in different places depending on the vocalist. Plus, it's a great idea to mount the pop filter on a separate mic stand. This allows you to move the mic around while maintaining the spot where the vocalist stands. Keep in mind that the vocalist doesn't have to be on axis with the capsule of the microphone. It's quite alright to experiment with having the vocalist sing off to the side of the mic. This technique may reduce the amount presence and help the vocal fit right into the mix.
I hope this information helps you get started with tracking amazing vocals. The vocalist can be the most amazing singer in the world, but how they're recorded is half of the quality. So work with your vocalists and talk to them if you're hearing something that doesn't sound good. It's perfectly normal to have a vocalist do another take if there are problems with the recording. Never fall back on the notion that it can be fixed in the mix. Strive to be the best engineer you can be and do everything you can to get solid vocal tracks. Less is more and this goes a long way when you start to mix and the vocals already sound perfect. A few tweaks here and there and you should be able to get the right sound for the mix. Please leave a comment if you have any questions about the techniques that I've listed here.
Multiple mixes will always yield a better album
Multiple mixes of a song is a technique that I've developed over the many years of my career. Music tends to unfold differently every time you approach a mix. If you're using a program that allows you to save or save as multiple times, such as ProTools or logic, it's not a bad idea to try a new mix even if you think you nailed it the first time.
Here's how I like to set up my sessions. After I record, I like to save the session as just a raw track that hasn't been mixed. Then 'save as' the name of the track_mix1. This way I have a template to go back to when I want to create a new mix. You can repeat this process as many times as you like. I usually tend to think at least three mixes is a good reference point to determine whether or not you like a mix. Sometimes it's a good idea to try up to 10 mixes.
Try this, set up a timer and give yourself a time limit for the mix. Anywhere between 10 to 15 minutes should be enough time to get a good rough mix. When the timer goes off, save your mix session, close it, & open a new session.
After you feel that you've made enough versions of the mix, go back and review each of the mixes. You can bounce each of the mixes down as an MP3 file and put them on your phone or MP3 player. Then go for a run, take a drive, or head over to a friend's house and listen to your mixes outside of the studio. This will give you a reference point as to which mix is probably the best and/or if a few mixes should be worked on and handed to a client for review.
Try this technique on your next mix and see what happens. You may be surprised that the third or fourth mix is actually the one that you wind up keeping.